Explore the definitive guide to tennis courts layouts. Learn dimensions, orientation, surfaces, and multi-court design for optimal play and facility planning.
A proper tennis court layout is much more than just lines on the ground; it’s the very foundation of a safe, fair, and exhilarating game. The blueprint for every court starts with the standardized playing area and, just as critically, the run-off space that gives players room to move. All in, a regulation court needs a total footprint of 120 feet by 60 feet to accommodate the action safely.
The Blueprint for a Perfect Tennis Court
Think of a court layout as the architectural plan for the game itself. It’s a precisely engineered space where every line has a purpose and every inch of open ground is essential for high-level play. Get this wrong, and you undermine the sport's consistency, fairness, and safety. The foundation of it all begins with the official, non-negotiable dimensions.
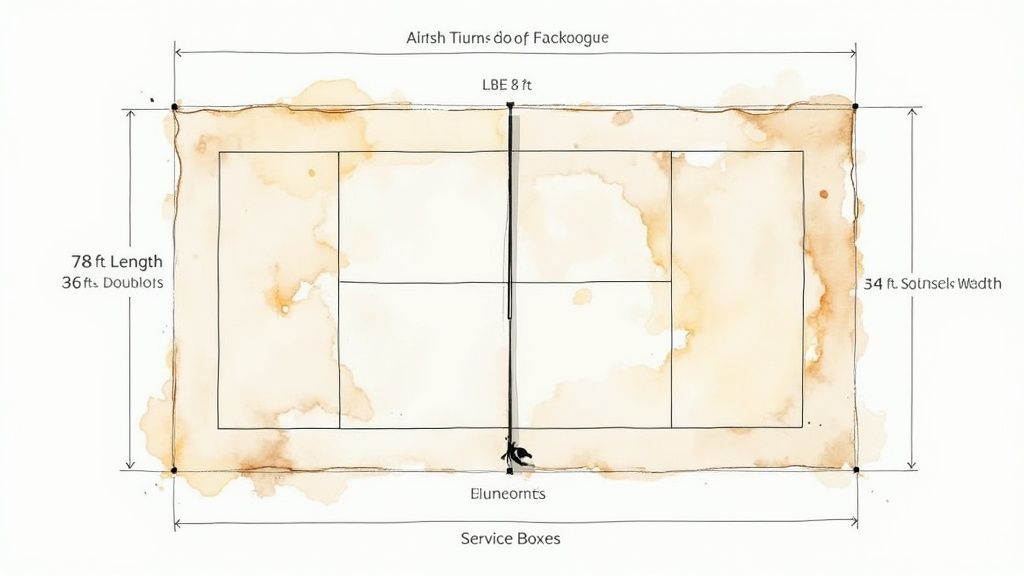
For decades, the International Tennis Federation (ITF) has meticulously standardized these measurements, ensuring a player in London has the exact same experience as one in Los Angeles. A regulation court is precisely 78 feet long, with a width of 27 feet for singles and 36 feet for doubles. The net is exactly 3 feet high at the center and 3 feet 6 inches at the posts, creating that subtle sag that can make or break a low shot over the middle.
Beyond the Playing Lines
But the chalk lines only tell half the story. The real secret to a functional and safe court lies in the "run-off" space—the open area surrounding the court. This is where the most athletic and dynamic moments of a match unfold.
The recommended total area for a single court is 120 feet by 60 feet. This provides 21 feet of run-off behind each baseline and 12 feet on each side, which is absolutely essential for player safety.
Imagine a player sprinting at full tilt to chase down a wide forehand or scrambling backward to return a deep lob. That run-off area is what allows them to decelerate safely without crashing into a fence, a bench, or the next court over. Skimping on this space doesn't just limit play; it creates genuine hazards.
This concept map breaks down the relationship between the playing court, the crucial safety run-off areas, and the total footprint you actually need.
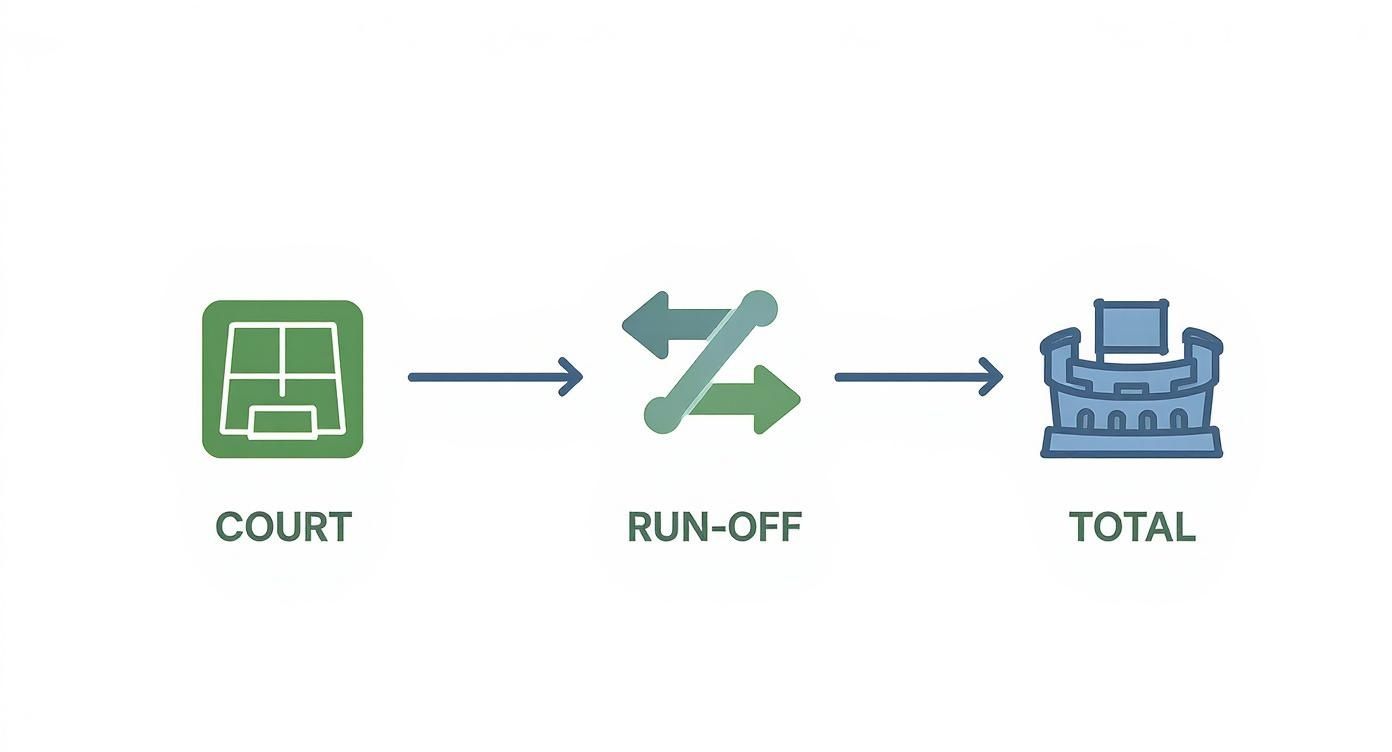
Infographic about tennis courts layouts
As you can see, the official playing area is just one piece of a much larger puzzle. The run-off space nearly doubles the total required land.
Official Tennis Court Dimensions at a Glance
To make planning a bit easier, here’s a quick-reference table breaking down the most important measurements for any standard tennis court. Getting these numbers right is the first step in any successful court project.
| Measurement | Dimension (Imperial) | Dimension (Metric) |
| :--- | :--- | :--- |
| Total Length | 78 ft | 23.77 m |
| Singles Width | 27 ft | 8.23 m |
| Doubles Width | 36 ft | 10.97 m |
| Net Height (Center) | 3 ft | 0.914 m |
| Net Height (Posts) | 3 ft 6 in | 1.07 m |
| Service Box | 21 ft x 13.5 ft | 6.4 m x 4.11 m |
| Run-off (Baseline) | 21 ft | 6.4 m |
| Run-off (Sideline) | 12 ft | 3.66 m |
| Total Area | 120 ft x 60 ft | 36.57 m x 18.29 m |
Whether you're building from scratch or renovating an existing facility, these dimensions are your guide. For clubs ready to turn these blueprints into a functional reality, exploring custom design solutions for sports facilities can provide the expertise needed to get every detail right.
Why Court Orientation Can Make or Break a Match
Ever tried to hit a game-winning serve while staring straight into the blinding sun? It’s nearly impossible. That single moment, where a split-second reaction means everything, shows why one of the most critical parts of any court layout is its orientation.
Get this detail wrong, and you can accidentally hand one player a massive, unfair advantage. The sun’s path is predictable, and so are the problems it causes. An incorrectly aligned court forces players on one side to battle disabling glare during the most popular times to play. This isn't just a small annoyance—it's a genuine issue of fairness and safety that can ruin the integrity of a match.
The Gold Standard: North-South Alignment
To solve this, the universally accepted best practice for any outdoor court is a north-south orientation. This alignment sets up the court so the sun rises and sets perpendicular to the direction of play.
Think of it this way: the players stand at the north and south ends, while the sun travels from east to west. It crosses *over* the court instead of shining directly into either player's face. This simple trick ensures the sun is almost never in a player's direct line of sight when they look up for a serve or an overhead. It dramatically improves playability during the morning and evening hours when the sun is at its lowest, most intense angle.
A true north-south axis is the single most effective design choice for ensuring fair play on an outdoor tennis court. It minimizes the time any player has to spend looking directly into the sun, creating an equitable playing field from dawn until dusk.
This satellite view shows a well-planned facility where the courts are perfectly aligned along that north-south axis to keep the sun out of players' eyes.
Screenshot from https://www.google.com/maps
You can see how the length of the courts runs from top to bottom (north to south). This means the sun's east-to-west path crosses the sidelines, not the baselines where players serve and receive.
Accounting for Site-Specific Obstructions
Of course, a perfect north-south line is just the starting point. Your specific property might have other things to worry about. You have to look at the entire environment for potential headaches.
For example, tall buildings or a line of dense trees can cast long, moving shadows across the court. A layout that looks flawless on paper might be a nightmare in reality if a nearby building blocks the sun every afternoon. This creates a different kind of visual distraction that's just as bad as direct glare.
Before you finalize any layout, walk the site and look for:
- Buildings: Nearby structures can throw large, hard-edged shadows that creep across the playing surface as the day goes on.
- Trees: A beautiful oak tree might be great for shade, but its dappled light can make tracking a fast-moving yellow ball incredibly frustrating.
- Topography: Hills or slopes to the east or west can mess with your playing hours, effectively delaying sunrise or bringing on an early sunset for your courts.
By planning for both the sun's path and what’s *around* the court, you create a truly professional and fair playing environment that your members can enjoy all day long.
Planning Your Multi-Court Facility Layout
Moving from a single court to a multi-court setup is a whole different ball game. Suddenly, it’s not just about one court's dimensions. You’re orchestrating a complete environment where multiple matches can unfold at the same time without players tripping over each other. Nailing the layout is key to maximizing your land and giving players an experience that keeps them coming back.
When you're arranging multiple courts, you really have two main choices. Each has its pros and cons, and the right one depends entirely on your property and what you want to achieve.
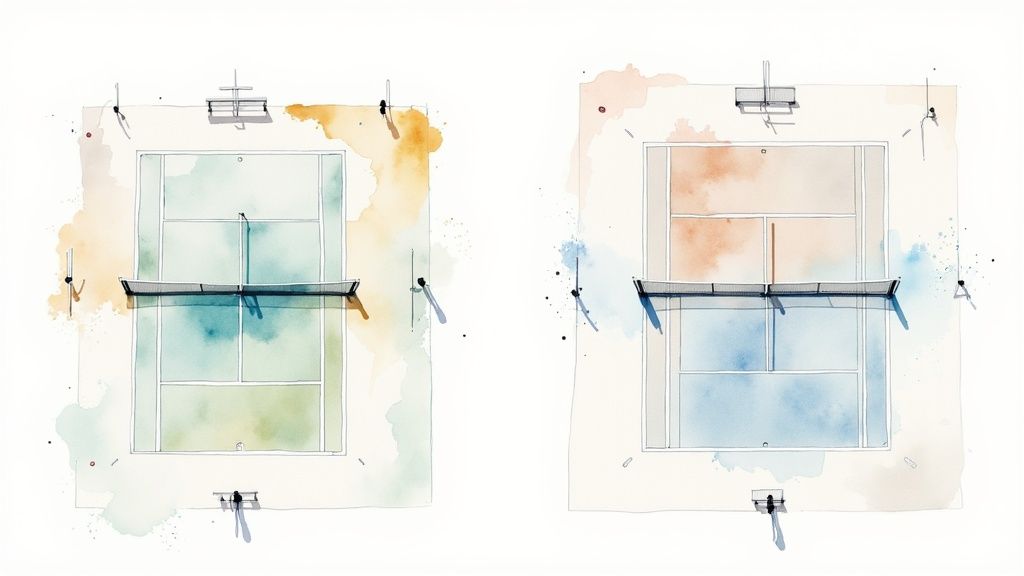
Side-by-Side Layouts
The most common and land-efficient setup you'll see is the side-by-side layout. Just as it sounds, the courts are placed right next to each other, sharing a sideline. This approach lets you pack the maximum number of courts into a standard rectangular piece of land.
But the secret to making this layout work isn't just cramming them together. It’s all about the space *between* them.
The absolute bare minimum is a 12-foot gap between the sidelines of adjacent courts. This isn't just a suggestion; it's a critical safety buffer that stops players from crashing into a fence or running onto the next court during a wild point.
That 12-foot alley also has a practical job. It’s where you’ll put player benches, umpire chairs, and create clear walkways for everyone to get around without disrupting a match. Squeeze that space, and you create a cramped, hazardous facility.
End-to-End Layouts
The other option is the end-to-end configuration, with courts laid out one after another, sharing a baseline. You don't see this nearly as often because it demands a long, narrow plot of land and is just not as efficient as placing courts in parallel.
Still, an end-to-end layout can be the perfect fix for certain situations:
- Fewer Distractions: With no one playing right next to you, players get fewer visual and auditory interruptions from other matches.
- Better Spectating: This setup is fantastic for a "show" or "stadium" court. You can line the sides with spectator seating without other courts blocking the view.
- Awkward Land Shapes: If you’re stuck with a uniquely long and skinny property, this might be your only real choice.
Choosing between these tennis courts layouts is a balancing act between using your land wisely, creating a great player experience, and accommodating spectators. Of course, the court design itself is just one piece of the puzzle; successful projects always account for the modern management of sports facilities.
Grouping Courts into Banks
For larger clubs with four or more courts, the smart move is to group them into "banks" or "batteries." A popular strategy is to create banks of two, three, or four parallel courts, all separated by a wide central walkway. This central path becomes the facility's main artery, giving you a clear spot for seating, shade, and water fountains.
For instance, a typical eight-court club might be set up as two banks of four courts. This modular design keeps everything organized and stops the place from feeling like a confusing, endless sea of green. It also makes it much easier to plan for infrastructure like lighting and drainage. This kind of thoughtful grouping is a game-changer, especially if you plan to host tournaments.
While our focus here is on tennis, many of these planning principles apply across racket sports. If you're exploring other options, our guide on launching a padel club shares some complementary insights on smart facility design.
How Your Court Surface Dictates the Layout
Choosing a court surface isn't just about bounce and speed; it's a foundational decision that sends ripples through your entire site plan. Think of it like deciding on the foundation for a house. A simple concrete slab has vastly different requirements than a full basement with complex plumbing, and the same logic applies to tennis courts.
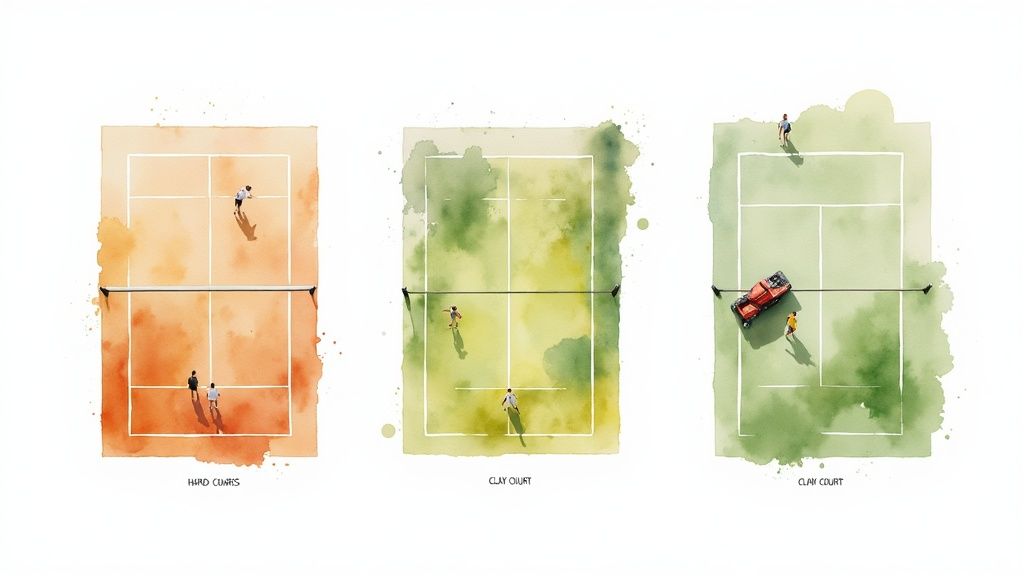
Each of the "Big Three" surfaces—hard, clay, and grass—comes with its own unique set of logistical demands. This choice will shape everything from the sub-base engineering and drainage systems to the amount of precious space you need to set aside for ongoing maintenance. It’s a decision that goes far beyond the playing experience; it defines the long-term operational footprint of your facility.
Clay tennis court being watered
Hard Court Layout Considerations
Hard courts, typically built from asphalt or concrete with acrylic topcoats, are the most common surface for a reason. They offer a fantastic all-around playing experience and are relatively low-maintenance. But don't let that fool you—their layout requires some serious planning beneath the surface.
Because hard courts are non-porous, water management is everything. The entire court slab has to be constructed with a precise, almost imperceptible slope—usually 1 inch of fall for every 10 feet—to guide rainwater off the surface. This means your site plan absolutely must include proper drainage channels or swales around the perimeter to handle that runoff. Get this wrong, and you’ll have pooling water that damages the court and creates major slip hazards.
Clay Court Infrastructure Needs
Clay courts, loved for their slower play and iconic slides, are a completely different animal. A clay court is a living, breathing thing that needs constant moisture to stay in playing shape, and this fundamentally changes the layout you'll need around the court itself.
A proper clay court plan has to account for:
- An Irrigation System: You'll need space for either an underground sprinkler system or a manual watering setup. That means water lines and spigots have to be strategically placed for full coverage.
- Maintenance Equipment Storage: Keeping clay in top condition involves heavy rollers, big drag brushes, and line sweepers. Your layout must include a dedicated shed or storage area nearby to house all this bulky gear.
- Material Storage: You'll also need a place to store extra clay material for annual reconditioning and patching.
These elements add a surprising amount to the overall footprint, turning a simple court area into a much more involved operational zone.
A common mistake is underestimating the ancillary space a clay court needs. Beyond the standard 120 ft by 60 ft court area, you must factor in the surrounding infrastructure for watering and maintenance from day one of planning.
Grass Court Spatial Demands
Grass courts are the dream—the pinnacle of classic tennis. They are also, by far, the most demanding in terms of space and upkeep. You’re not just building a court; you're cultivating a highly specialized lawn that requires the same level of care as a professional golf green. This has massive implications for your facility's layout.
The sheer volume of equipment you'll need is substantial. We're talking industrial-grade mowers, aerators, rollers, and line markers, all of which require significant, secure storage. More importantly, your groundskeeping team needs plenty of room to maneuver this machinery around the courts without wrecking the playing surfaces. This often means wider pathways and larger buffer zones between courts, which can dramatically increase your total land requirement.
Court Surface Impact on Layout and Infrastructure
To make the right call, you have to understand the true spatial and infrastructural commitment of each surface. This table breaks down how each option really impacts your site plan.
| Surface Type | Key Layout Consideration | Drainage System Needs | Maintenance Footprint |
| :--- | :--- | :--- | :--- |
| Hard Court | Precise slope for water runoff is built into the sub-base. | Requires perimeter drains or swales to manage surface water. | Minimal: Requires small space for squeegees and blowers. |
| Clay Court | Must include space for irrigation lines and water access points. | Relies on a sloped sub-base beneath the porous clay surface. | Significant: Needs a dedicated shed for rollers, brushes, and material storage. |
| Grass Court | Requires wide access paths for large groundskeeping machinery. | Complex subsurface drainage system is essential for root health. | Extensive: Demands a large, secure building for mowers and specialized equipment. |
Ultimately, your surface choice is a long-term investment that will dictate not just how the ball bounces, but your facility's daily operations and overall land usage for years to come.
Thinking Beyond the Baseline: Fencing, Lighting, and Drainage
Tennis courts at night under bright lights
A truly great tennis court is more than just a perfectly painted surface. The real magic happens when you integrate the essential infrastructure: fencing, lighting, and drainage. These aren't just add-ons; they're core components that define a court's safety, playability, and long-term value.
Getting these elements right from the very beginning saves you from a world of headaches and expensive fixes down the road. They are what separate a basic court from a professional-grade facility that can handle anything from a stray lob to a sudden storm.
Securing the Perimeter with Fencing
Fencing is the most obvious piece of the puzzle, and its job is twofold: keep the balls in play and keep the court secure. A stray ball flying into another court isn't just a distraction—it's a genuine safety risk that can disrupt a critical point or even cause a collision.
The industry standard for tennis court fencing is 10 to 12 feet in height. This isn't an arbitrary number; it’s the sweet spot for containing most lobs, powerful serves, and wild shots, ensuring the game flows without interruption. While standard chain-link is the go-to for its ruggedness and cost, vinyl-coated options give a more polished look and better rust protection.
When you're dealing with multiple courts, the fences *between* them are just as vital. These are also typically 10 to 12 feet high to prevent matches from interfering with one another. Some clubs, however, get creative and use lower 4-foot dividers near the center of the court bank, which can open up the sightlines for spectators without a major compromise on safety.
Lighting Up the Court for Night Play
This is what turns your facility from a 9-to-5 operation into a 24/7 asset. But great lighting isn't about just making things bright. The real goal is to bathe the entire court in uniform, glare-free light, killing any shadows that could make the ball disappear mid-flight.
It all comes down to smart pole placement. For a single court, you're usually looking at six to eight poles set up just outside the fence line. This setup ensures light hits the court from multiple angles, effectively washing out the shadows cast by the players themselves.
How bright do you need to go? It’s all about the level of play, measured in foot-candles:
- Recreational Play: 30-50 foot-candles is plenty for casual games and practice.
- Club or Tournament Play: You’ll need to step it up to 50-75 foot-candles for competitive matches.
- Professional or Televised Events: These venues crank it up to 100+ foot-candles to make sure every detail is crystal clear for the broadcast cameras.
Today, modern LED systems are the only way to go. They're far more energy-efficient, last longer, and produce a much cleaner quality of light than the old metal halide fixtures.
Mastering Water with Smart Drainage
Drainage is the unsung hero of every outdoor court. It’s the silent system working beneath your feet to prevent water damage, eliminate dangerous slick spots, and get you back playing minutes after the rain stops. Without it, one downpour can shut down your courts for days, leading to cancelled matches and lost revenue.
Your drainage strategy is completely tied to your court surface. As we've covered, non-porous hard courts use a precise surface slope to shuffle water toward drains along the perimeter. Porous surfaces like clay or grass, on the other hand, need a more sophisticated subsurface system.
For a grass or clay court, this often means a layered system of perforated pipes sitting in gravel-filled trenches. This design lets water filter straight through the surface and get carried away, forming the backbone of a true all-weather court.
For any outdoor facility, water management is non-negotiable. Getting a handle on expert drainage solutions for yards can offer great insights for club managers. Proper drainage isn't a luxury—it's the foundation of a resilient, high-performance tennis facility.
Designing a Layout for Players and Spectators
A truly great facility is about more than just the game—it’s about the entire human experience. The best tennis court layouts are designed to create a space that feels welcoming, intuitive, and comfortable for everyone, from players and coaches to the fans cheering them on. This is what separates a simple block of courts from a thriving community hub.
It all starts with getting people in the door, easily and safely. Planning for accessibility from the very beginning isn't just about compliance; it's the mark of a top-tier facility. This means ensuring every path, viewing area, and amenity is built to meet or exceed Americans with Disabilities Act (ADA) guidelines. Think smooth, wide walkways with no surprise obstacles—essential for wheelchair access, but also a huge benefit for anyone navigating the grounds.
Enhancing the Viewing Experience
Spectator comfort has a direct impact on the energy of your club. Well-placed seating can turn a simple Saturday match into a real event, but get it wrong, and it can be a constant distraction. The trick is to give people clear lines of sight without ever getting in the way of the players' run-off areas.
A smart approach is to offer a few different types of seating:
- Casual Seating: Simple, tough benches along the walkways between court banks are perfect. They give parents a spot to watch a lesson or players a place to hang out before their match.
- Tiered Bleachers: If you have a main "stadium" court for tournaments, tiered bleachers are a must. They guarantee everyone gets a great, unobstructed view of the action.
- Shade Structures: In sunny climates, this is non-negotiable. Adding awnings or pergolas over seating areas is a game-changer for spectator comfort and keeps people around longer.
Thoughtfully designed spectator areas do more than just provide a place to sit; they create an engaging atmosphere that celebrates the sport and supports the players. They are a fundamental part of a successful tennis facility layout.
Placing Amenities for Seamless Flow
Beyond the seating, the location of your amenities dictates the entire flow and feel of your club. A great layout anticipates what people need and puts it right where they'd expect to find it. Just follow the natural path someone takes from the moment they arrive.
Water fountains need to be easy to get to from every court, so players aren't wandering off mid-match. Restrooms should be centrally located but tucked away from the courts to keep noise and foot traffic to a minimum. A central clubhouse or pro shop can act as a natural gathering point, strengthening that community vibe. These little details in your tennis courts layouts make all the difference in creating a smooth, positive experience. And for club managers, pairing a great physical layout with a quality tennis court reservation software solution is the final touch, making it incredibly simple for members to book and play.
Got Questions About Tennis Court Layouts? We’ve Got Answers.
When you're planning a new tennis facility, a few practical questions pop up almost immediately. Getting these right from the start is the difference between a world-class court and a costly mistake. Let's cut through the noise and tackle the essential questions we hear from club managers every day.
Think of this as your quick-reference guide. Nailing these fundamentals ensures your courts are safe, playable, and built to last, whether you’re breaking ground on a single court or a massive multi-court complex.
What’s the Real Footprint for a Single Tennis Court?
The playing lines are just the beginning. While a standard doubles court measures 78 feet by 36 feet, that’s not nearly enough space. To do it right, the absolute minimum you should plan for is a total area of 120 feet long by 60 feet wide.
So, where does all that extra space go? It’s for the run-off area—the safety buffer that gives players room to chase down a drop shot or sprint for a wide slice. This includes 21 feet of clear space behind each baseline and 12 feet on both sides. This isn't just a recommendation; it's a critical safety zone that prevents players from crashing into fences and other hazards.
How Much Room Do I Need Between Multiple Courts?
If you’re building courts side-by-side, the gap between them is just as important as the perimeter run-off. The industry standard is a non-negotiable minimum of 12 feet (3.66m) between the sidelines of adjacent courts.
This spacing is there for a few crucial reasons:
- Keeps Players Safe: It stops a player on Court 1 from running directly into a match happening on Court 2.
- Makes Room for Gear: This is where you’ll place umpire chairs, player benches, and water coolers without creating tripping hazards.
- Creates a Clear Pathway: It gives players, coaches, and officials a safe and obvious way to walk between courts without interrupting play.
Trying to squeeze in an extra court by shrinking this gap is one of the most common—and dangerous—mistakes a club can make. It creates a cramped, unsafe environment that frustrates players and can lead to accidents.
Skimping on the space between courts is a common but costly mistake. The 12-foot minimum is essential for operational flow and player safety in any multi-court tennis layout.
Why Does Everyone Say to Build Courts Facing North-South?
The north-south orientation isn't just a tradition; it’s the golden rule of outdoor court design for one simple reason: the sun. Players are constantly looking up—to serve, to hit an overhead, to track a lob. An east-west court forces one player to stare directly into the blinding glare of the rising or setting sun.
This creates an unfair—and frankly, dangerous—playing field. By aligning the court’s length along a north-south axis, the sun travels across the sky, not into the players' eyes. This one simple decision ensures fair conditions for both players during those popular morning and evening playing times.
Planning and building a top-tier tennis facility is one thing; managing it seamlessly is another. Book & Go provides the simple, powerful booking and management software that helps a perfectly designed club run smoothly. Give your members the five-star experience they deserve from the moment they book a court. See how we can streamline your operations at https://www.bookandgo.app/en.
Tags:tennis courts layoutstennis court designcourt dimensionssports facility planningtennis court surfaces
Ready to Transform Your Sports Club?
See how Book & Go can help you implement these strategies and grow your business.
Related Articles
Thought Leadership
How to book a badminton court: Easy online booking
Learn how to book a badminton court online in minutes: compare times, prices, and nearby courts.
16 min readRead more
Thought Leadership
7 Top Spots for Padel Los Angeles: Your 2025 Player's Guide
Discover the best courts, clubs, and gear for padel Los Angeles. Our guide covers where to play, book lessons, and find partners across the city in 2025.
20 min readRead more
Thought Leadership
7 Best Ways to Find a Padel Club Near Me in 2025
Searching for a 'padel club near me'? This guide ranks the 7 best apps and directories to find and book padel courts, classes, and matches in your area.
20 min readRead more